How Long Is a Deck Building Timeline in Ontario, CA? A Local Builder’s Step-by-Step Answer
If you have been asking whether a deck building timeline is long enough to derail your plans, here is the honest answer from a local Ontario, California builder: the build itself is usually the shortest part. Most of the calendar gets eaten by design decisions, permits through San Bernardino County or the City of Ontario, and material lead times. That surprises a lot of homeowners, especially anyone with a sloped or multi-level yard who assumes the tricky part is the framing.
This guide walks the whole process step by step, in order, the way it actually happens on a real Inland Empire project. No national franchise fluff, no timelines copied from a site written for Ontario, Canada. Just what happens, when it happens, and where the schedule stretches.
One note before we start: every yard is different. A flat lot in Chino behaves differently than a hillside in Rancho Cucamonga, so treat the sequences below as a realistic map, not a promise.
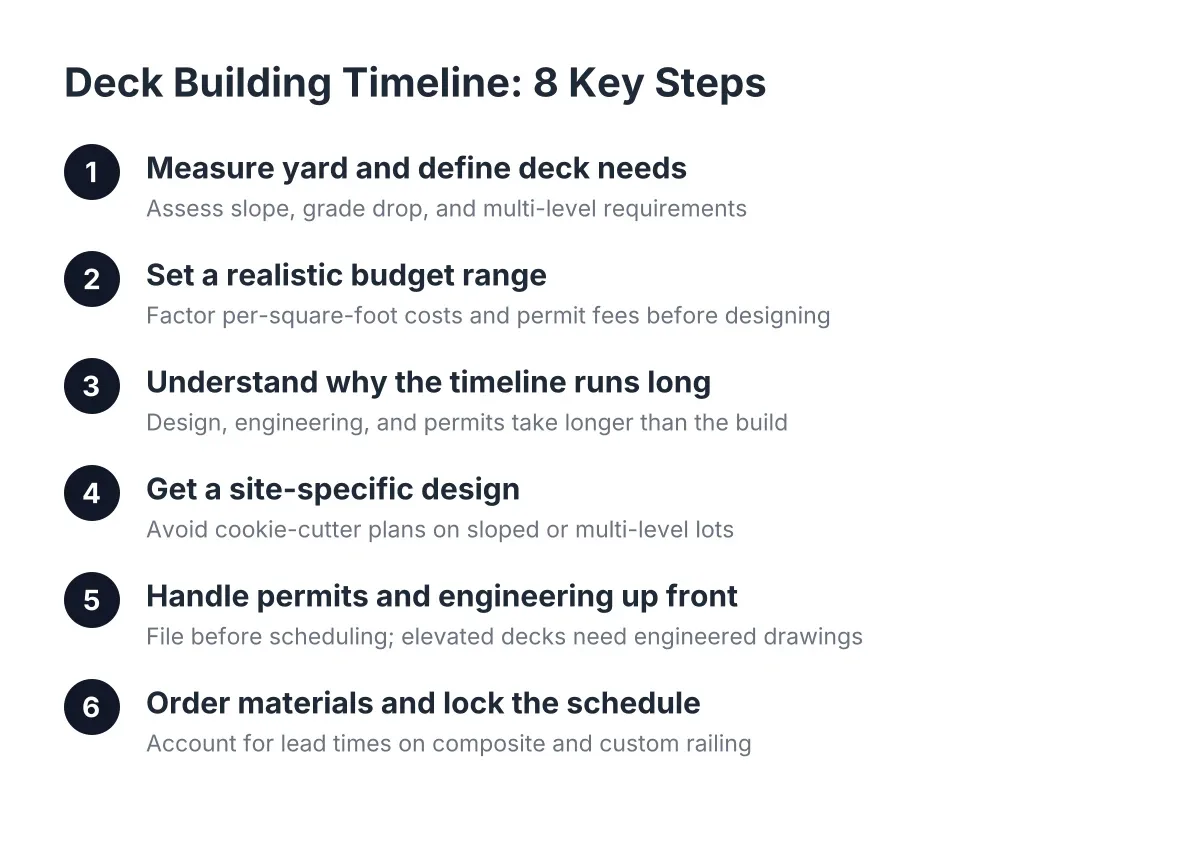
Step 1: Measure Your Yard and Define What the Deck Has to Do
Start with the problem, not the deck. Walk your yard and write down what makes it awkward. Does it slope away from the house? Is your back door a full story above grade? Do you need to connect a walkout level to the yard below?
This matters because the answer changes everything downstream. A simple ground-level wood deck and an elevated deck construction project on a slope follow different paths through design, engineering, and permits. Homeowners with tricky lots often get quotes from builders who priced a flat-yard deck, then act confused when they see the grade. Defining the problem clearly up front filters those builders out early.
Take rough measurements, note the drop from your door threshold to the ground, and photograph the slope from a few angles. A deck builder who knows multi-level work can tell a lot from those photos before anyone visits.
Step 2: Set a Realistic Budget Range Before You Fall in Love with a Design
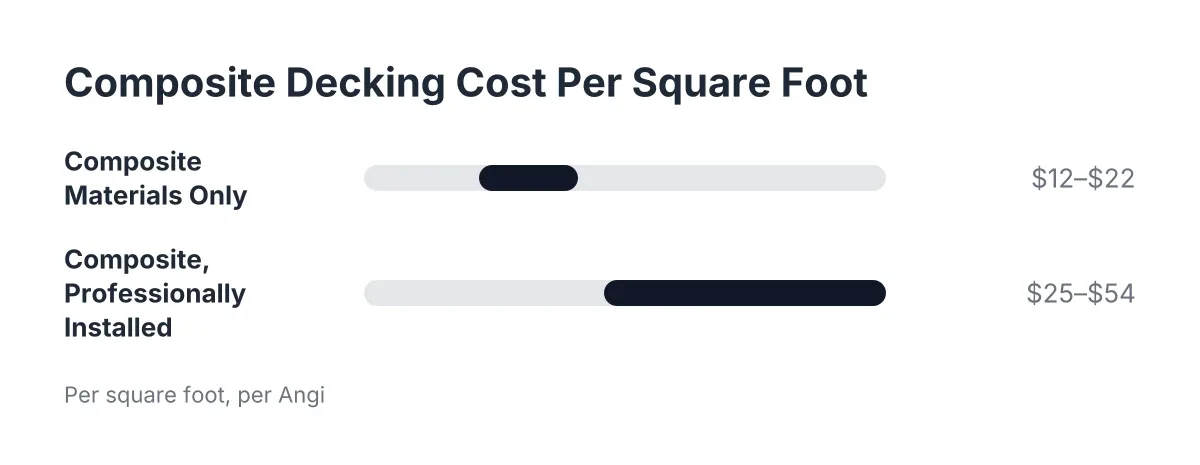
Know your numbers before you sketch anything. According to Angi, a professionally built deck averages $30 to $60 per square foot, and composite decking runs $25 to $54 per square foot installed. Elevated and multi-level decks land toward the higher end because footings, posts, and framing carry more load and take more labor.
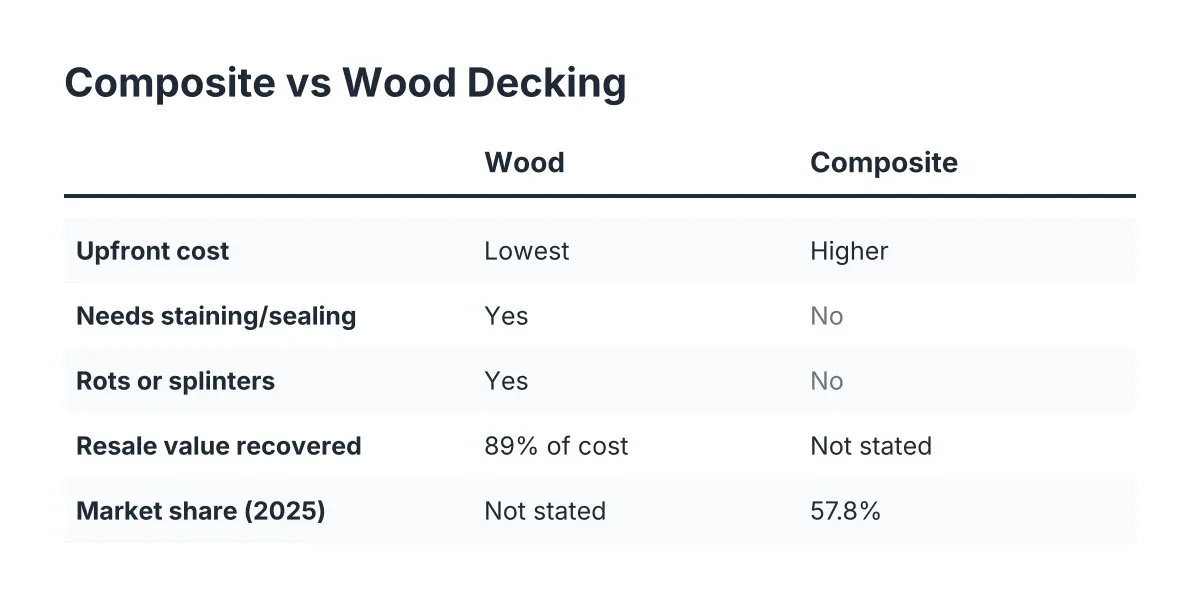
If you are prepping a home for sale, this step decides your whole path. A seller listing in three months usually gets more value from deck repair, deck board replacement, or deck resurfacing than from new construction, because a full custom deck rarely fits a listing window. Deck staining and sealing can make a tired but sound deck presentable in days, not months.
In addition, budget for the paperwork. According to HomeAdvisor, a deck building permit typically costs between $230 and $500 depending on location. It is a small line item, but skipping it creates problems at inspection and at resale.
Step 3: Understand Why the Deck Building Timeline Runs Long Before Construction Starts
How long is the deck building timeline before a crew ever shows up? For a permitted custom deck in Ontario, CA, the design, engineering, and permit phase commonly takes several weeks to a couple of months, while the physical build often takes one to three weeks. In other words, most of the wait happens on paper, not in your yard.
Here is where the calendar goes:
- Design revisions. Expect two or three rounds before drawings are final, more if the lot slopes or the deck attaches at a second story.
- Structural engineering. Elevated deck construction above a certain height usually needs engineered plans for footings, posts, and connections. This adds time but protects you at inspection and resale.
- Permit review. The city or county reviews plans on their schedule, not yours. Corrections and resubmittals add cycles.
- Material lead times. Standard pressure-treated lumber is usually stocked locally. Specific composite lines, custom deck railing, and certain Trex decking colors can take weeks to arrive, especially popular shades.
Therefore, the single best thing you can do for your schedule is make decisions early and stop changing them. Every revision after plans are submitted restarts part of the clock.
Step 4: Get a Site-Specific Design, Not a Cookie-Cutter Layout
Insist on a design drawn for your actual lot. Free deck plans PDF downloads are fine for gathering ideas, but they assume a flat yard and a standard door height. If your Fontana or Upland backyard drops six feet from the house to the fence line, a generic plan will not survive contact with your grade.
For sloped and multi-level yards, the design phase should answer specific questions. Where do the footings land on the slope? How do the levels step down? Does the upper deck attach to the house ledger or stand freestanding? A builder experienced with deck footing and post installation on uneven terrain will raise these questions without being prompted. If a builder does not ask, that tells you something.
For example, suppose a homeowner in Rancho Cucamonga has a walkout door eight feet above a sloped yard. A single elevated platform might cost more than they expect, but a two-level design that steps down the slope can create more usable outdoor living space from the same footprint and spread the structure across shorter posts. That is the kind of trade-off a site-specific design surfaces and a downloaded plan never will.
Step 5: Handle Permits and Engineering Up Front
File for the permit before you schedule anything else. In Ontario, California and across San Bernardino and Riverside counties, most attached decks and any deck above a modest height off the ground need a permit and inspections. Elevated decks usually need engineered drawings as well.
Code details matter here. The California Building Code requires a minimum guardrail height of 42 inches for most residential decks more than 30 inches above grade, according to the California Building Standards Commission. As of 2026, inspectors in the Inland Empire check railing height, ledger attachment, and footing depth closely on elevated builds. Getting these right on paper is faster and cheaper than fixing them after a failed inspection.
However, this is also the step where you should lean on a professional rather than go it alone. Permit requirements vary between the City of Ontario, unincorporated county land, and neighboring cities like Chino and Corona, and an engineered elevated deck is not a DIY paperwork project.
Step 6: Order Materials and Lock the Construction Schedule
Once the permit is approved, order everything before the crew arrives. Framing lumber, footings hardware, decking boards, railing, fasteners, and stairs should all be confirmed and scheduled for delivery. A crew that shows up to a complete material package builds continuously; a crew waiting on backordered railing sits idle while your yard stays torn up.
This is also the point in deck building where weather works in your favor. Inland Empire conditions allow year-round construction for most of the calendar, which is an advantage over regions that lose whole seasons to snow. Summer heat can shift crew hours earlier in the day, and winter rain can pause concrete pours for footings, but full weather shutdowns are rare here.
Step 7: Build in Sequence, from Footings to Railing
The construction phase follows a fixed order, and each stage depends on the one before it:
- Layout and footings. The crew marks post locations, digs, sets forms, and pours concrete. On a slope, this stage takes longer because footing depths vary across the yard. Concrete then needs time to cure before it carries load.
- Posts and framing. Deck framing goes up on the cured footings. This is where an elevated or multi-level deck visibly takes shape, and where engineered connections get installed and inspected.
- Decking installation. Boards go down across the frame. Composite deck installation runs at a steady, predictable pace; intricate board patterns add time.
- Stairs and deck railing installation. Stairs on a slope involve careful math, and railing must meet that 42-inch code height on elevated sections.
- Final inspection. The city or county signs off. Keep this paperwork; if you sell the home later, a permitted, inspected deck answers buyer and inspector questions before they are asked.
For a straightforward attached deck, a typical crew moves through this sequence in about a week. A multi-level or elevated build with engineered footings on a slope can run two to three weeks of actual construction. Framed against the months of planning ahead of it, the build itself moves fast.
Step 8: Plan Around the Full Deck Building Timeline, Not Just the Build
Count backward from the date you want to use the deck. If the goal is a finished outdoor living space by early summer, and design plus permits can take one to two months before a one-to-three-week build, the math says start in late winter or early spring. Homeowners who call in May hoping for a Fourth of July deck are usually asking the deck building timeline to be shorter than the paperwork allows.
Sellers should run the same math in reverse. With 50 percent of America's roughly 50 million decks now more than 25 years old, according to the North American Deck and Railing Association, aging decks get flagged in pre-listing inspections constantly. If your listing is weeks away, repair, resurfacing, or staining and sealing fits the window; a new elevated build does not. Matching the scope to your timeline is the decision that saves you the most stress.
The short version: the deck building timeline is long mostly at the front end, where design, engineering, and permits live. Start those early, decide once, and the construction itself will feel quick.
If you need custom deck design, Inland Empire Decks can help.
Prefer to talk it through? Call (909) 298-8578 — a quick call is usually the fastest way to get a straight answer for your situation.