Deck Safety Inspection Checklist: What Professional Inspectors Actually Look For
If your deck has soft boards, a railing that wiggles, or an inspector's note attached to a home sale, you need a straight answer before you pay anyone for anything. This guide walks through the same points a professional inspector checks—a deck inspection checklist for DIY homeowners—in the same order, so you can size up the real risk yourself. It is written for Ontario, California homeowners, where sun exposure, dry summers, and older tract-home decks create a specific set of problems. By the end, you will know whether you are looking at a quick repair, a resurfacing job, or a deck that should come out before somebody gets hurt.
The numbers explain why this matters. According to North American Deck and Railing Association (NADRA), an estimated 50 percent of the roughly 50 million residential and commercial decks in the U.S. are more than 25 years old. Many of the decks we see across Ontario, Rancho Cucamonga, and Upland were built in the 1990s or earlier and have never had a formal inspection. Age alone does not condemn a deck, but it does mean the checklist below is worth an hour of your Saturday.
Why Inspectors Check the Structure Before the Surface
Homeowners look at deck boards. Inspectors look under them. That single difference explains why two contractors can walk the same deck and give you opposite answers. The boards are the part you see, but they are also the cheapest part to replace. The frame, the posts, the footings, and the connection to the house carry the actual load, and that is where decks fail.
A study using CPSC injury surveillance data found 224,000 people nationally were injured due to a deck or porch over a five-year period, with 33,000 of those injuries resulting from structural failure or collapse, according to Legacy Services LLC. Collapses almost never start with a surface board. They start at the ledger, the posts, or the railing connections. So this checklist works from the ground up, the way a professional does, and treats the deck boards as the last item, not the first.
One honest note before you start: this self-check tells you whether a problem exists and how urgent it is. It does not replace a hands-on deck safety inspection by someone who can probe framing lumber, pull a fastener, and crawl under an elevated deck. If anything below turns up a red flag, use this checklist to ask sharper questions, not to talk yourself out of professional help.
The Deck Inspection Checklist: A DIY Guide From the Ground Up
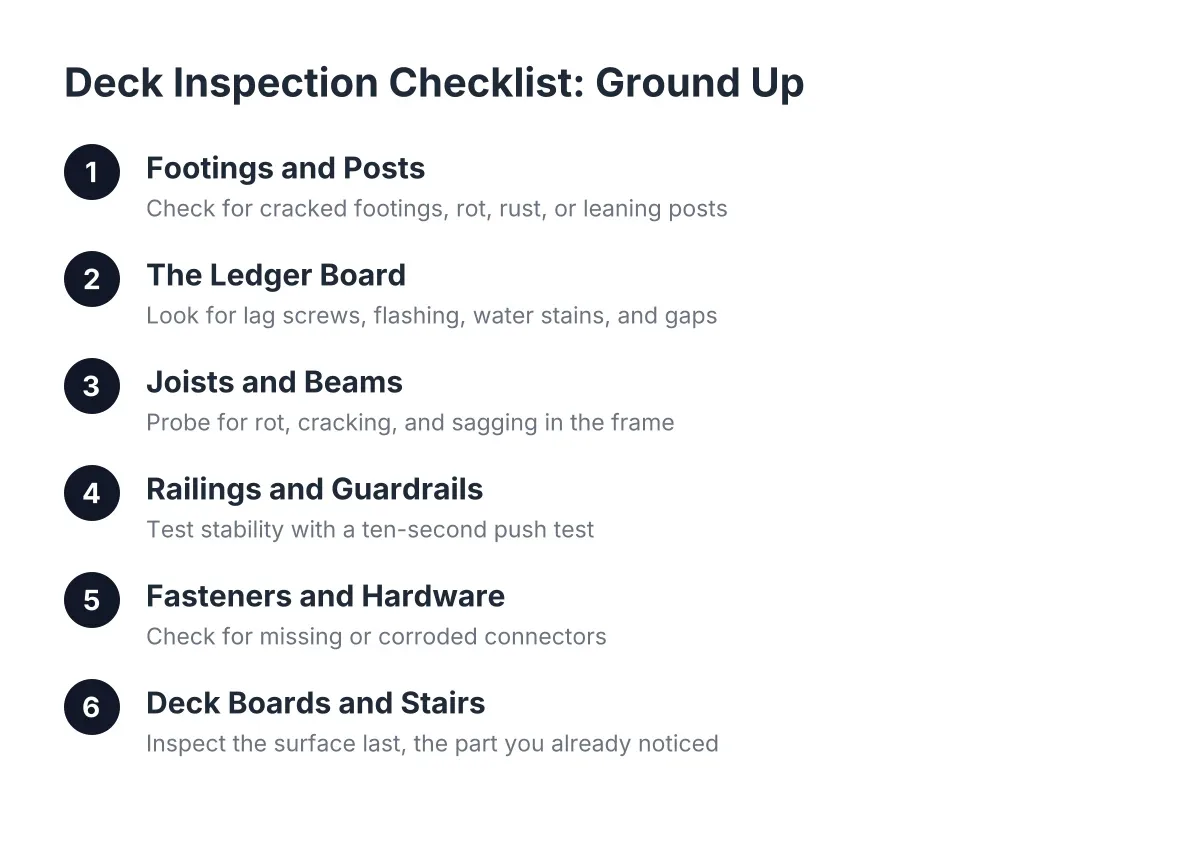
Work through these six areas in order. You will need a flashlight, a screwdriver or awl, and about an hour. Wear gloves if you are checking underneath an elevated deck.
1. Footings and Posts: Is the Deck Standing on Something Solid?
Start where the deck meets the ground. Inspectors check whether posts sit on concrete footings, whether those footings have shifted or cracked, and whether the post bases show rot or rust. In the Inland Empire, our soil goes through long dry spells followed by heavy winter rain, and that cycle can move footings that were set shallow or poured undersized.
Look for these specific failures:
- Posts resting directly on soil or on loose paver blocks instead of poured footings
- Concrete footings with wide cracks, tilting, or visible sinking on one side
- Rot at the bottom of wood posts; probe with a screwdriver where the post meets the footing
- Rusted or missing post bases, the metal brackets that connect post to concrete
- Posts that lean, or a deck that feels like it sways when you walk across it
Push a screwdriver into the base of each post. Sound wood resists. If the tip sinks in more than a quarter inch with light pressure, that post has rot, and rot at a post base is a structural problem, not a cosmetic one. Working through your DIY deck inspection checklist carefully at this stage is essential, as deck footing and post installation is one of the repairs that genuinely requires a builder, because the fix involves temporarily supporting the deck load.
2. The Ledger Board: Where Most Deck Collapses Start
The ledger is the horizontal board that attaches the deck to your house. When decks collapse, this connection is the most common failure point, because the entire house-side load hangs on it. Inspectors give the ledger more attention than any other single component.
Signs of deck ledger board failure include:
- The ledger attached with nails only, no lag screws or through-bolts visible
- A gap opening between the ledger and the house wall
- No metal flashing above the ledger, or flashing that is rusted through
- Water stains, soft wood, or dark streaks on the ledger or the house framing behind it
- Missing joist hangers, or hangers with empty nail holes
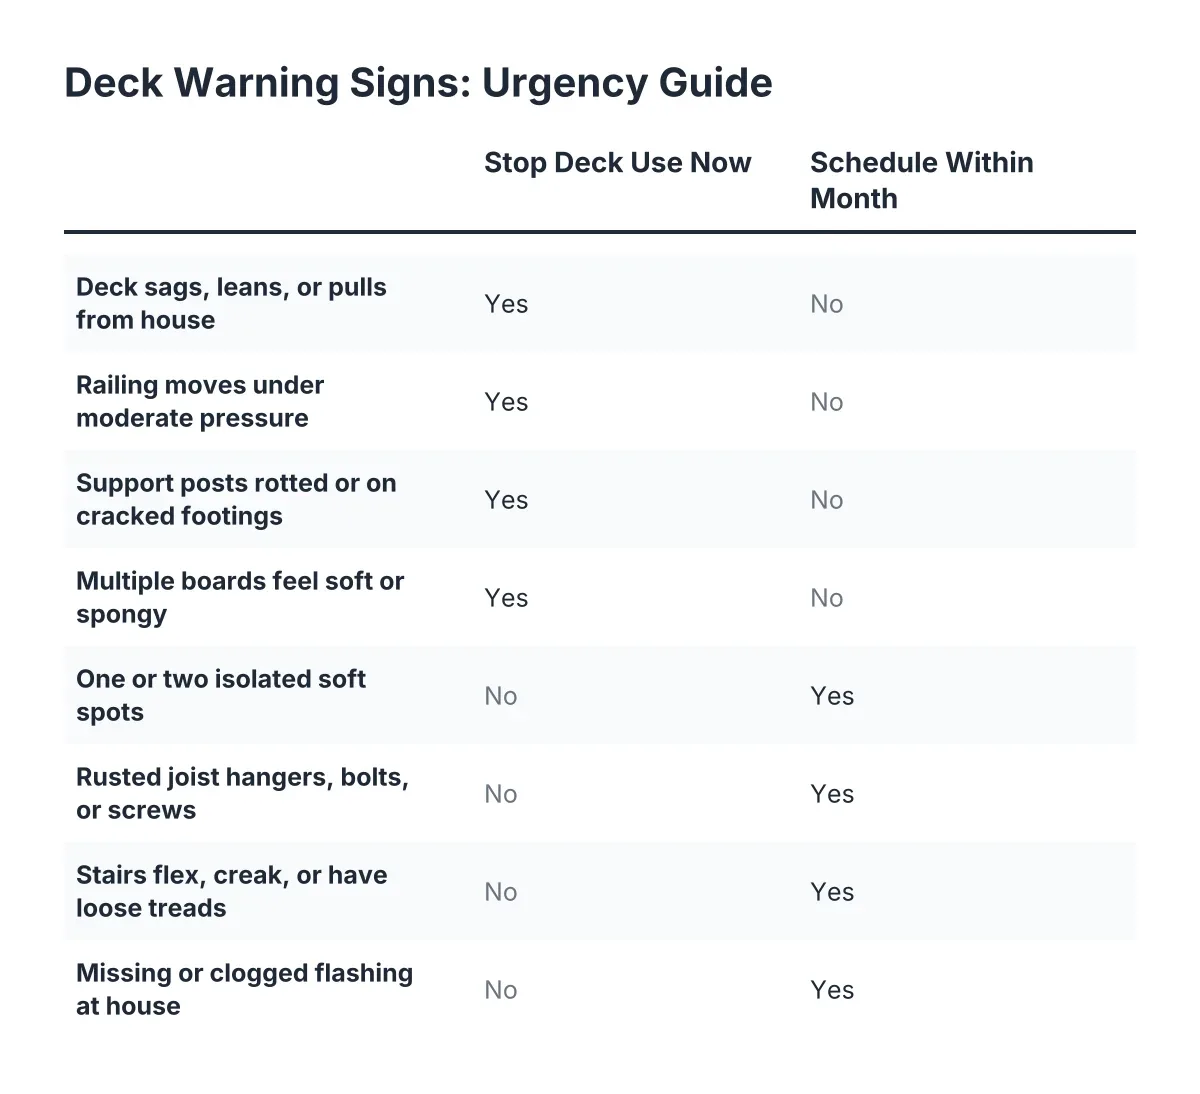
Here is the test inspectors use: look for bolt heads or lag screw heads in a staggered pattern along the ledger. Nails alone were common on older decks and are not enough. Water damage matters just as much. Even in our dry Southern California climate, winter rain that gets behind a ledger with bad flashing rots the connection from the inside, where you cannot see it until it fails. If your ledger shows soft wood or nail-only attachment, stop using the deck for gatherings until a professional evaluates it.
3. Joists and Beams: The Frame That Carries Every Step
Get under the deck if you can, or look between the boards from above on a low deck. Inspectors check the joists (the parallel boards that support the decking) and the beams (the larger members the joists rest on) for rot, cracking, and sagging.
Probe the tops of joists where the deck boards sit on them. This is where water collects and rot starts. Also check the ends of joists where they meet the ledger or the beam. A joist can look fine along its length and be crumbling at both ends. Watch for joists that have split along the grain, sistered boards from old repairs, and any visible sag when you sight down the length of the frame.
A frame with one or two rotted joists can often be repaired. A frame with widespread rot, undersized lumber, or sagging beams usually cannot be saved economically, and that is when replacement becomes the honest recommendation regardless of how good the deck boards look.
4. Railings and Guardrails: The Test That Takes Ten Seconds
Grab the top of the railing and push outward with about the force of an adult leaning on it. It should not move. A railing that flexes, rocks, or shifts at the posts will not stop a person who stumbles against it, and railing failure is one of the most common causes of deck injuries.
Height matters too, especially if you are selling. The California Building Code requires a minimum guardrail height of 42 inches for most residential deck applications above 30 inches in height, according to the California Building Standards Commission. Older decks around Ontario and Chino were often built with 36-inch railings, which met earlier codes. A home inspector working a 2026 listing will flag a short or loose railing every time, so sellers should measure before the buyer's inspector does.
Also check the balusters, the vertical pickets. Gaps should be narrow enough that a 4-inch sphere cannot pass through. Wide gaps are a child-safety flag on any inspection report. Deck railing installation is a contained, affordable fix compared to structural work, so a bad railing alone rarely means the whole deck is in trouble.
5. Fasteners and Hardware: The Quiet Failure Point
Inspectors carry a flashlight for this step because rusted hardware hides in shadows. Check every visible metal connector: joist hangers, post bases, bolts, and screws. Surface rust is normal on older galvanized hardware. Deep red corrosion, flaking metal, or fasteners that have popped or sheared are not.
In addition, look for nails backing out of deck boards and joist hangers missing nails in some of their holes. A hanger with half its nail holes empty carries half its rated load. This is one of the cheapest categories of deck repair, often just new structural screws and replacement hangers, but skipping it lets small movement grow into loose connections everywhere.
6. Deck Boards and Stairs: The Part You Already Noticed
Now the surface. Press on any board that looks dark, cupped, or cracked, especially near the house, around planters, and at stair treads. A board that flexes underfoot or feels spongy has rot. One or two soft boards mean deck board replacement. Soft boards scattered across the whole surface usually mean the moisture problem runs deeper than the boards.
Stairs deserve their own check. Confirm the stringers (the diagonal supports) are solid at top and bottom, treads do not flex, and the stair railing passes the same push test as the deck railing. Stairs fail more often than deck surfaces because they take concentrated, repeated loads.
Reading Your Results: Repair, Resurface, or Replace
Score your deck honestly against what you found. Professional inspectors group findings into the same three buckets.
Repair makes sense when the frame, posts, and ledger passed but you found isolated problems: a few soft boards, a loose railing section, rusted hangers, or nails backing out. These are contained fixes. For a home seller on a listing timeline, this is the best-case outcome, because targeted deck repair plus deck staining and sealing can get a flagged deck through a buyer's inspection in weeks, not months.
Resurfacing makes sense when the frame is sound but the surface is widely worn: cupped boards, splinters, faded finish, soft spots in multiple areas. Deck resurfacing keeps the existing structure and replaces the boards and railing on top of it, often with composite decking that ends the staining cycle. This is the middle path many homeowners comparing deck resurfacing vs replacement land on, and it only works if the framing genuinely passed steps one through three.
Replacement makes sense when the ledger, posts, or frame failed the checklist. Rot at the structure, a nail-only ledger, sinking footings, or widespread frame damage cannot be fixed by new boards on top. NADRA estimates that of the more than 60 million decks in the U.S., about 30 million are past their useful life and need replacement or repair. If your deck is in that group, spending money on surface work is throwing good money after bad, and a straight-shooting deck builder will tell you so.
To make this concrete, suppose a homeowner in Rancho Cucamonga is listing in April and the pre-listing inspection flags two soft boards, a 36-inch railing, and surface rust on the hangers, while the ledger and posts check out. In that scenario, the fix is board replacement, a new code-height deck railing, hardware swaps, and staining, a project measured in days. Now suppose the same inspection finds the ledger fastened with nails and rot at two post bases. That deck needs structural work or replacement, and no amount of deck restoration on the surface changes that answer.
How Often Should a Deck Be Inspected?
A deck should get a full walkthrough with this kind of checklist once a year, and a quick look after any heavy winter rain season. Decks more than 15 years old, decks that have never been inspected, and decks being prepped for a home sale warrant a professional evaluation on top of the annual self-check.
Annual timing matters in the Inland Empire because our damage pattern is seasonal. Summer sun in Ontario, Fontana, and Corona dries and cracks board surfaces, opening paths for winter rain to reach the framing. A spring inspection catches what the wet season did before the deck gets its heaviest summer use. Sellers should run the checklist the week they decide to list, not the week before escrow, because structural findings need lead time to fix.
Staining and sealing is part of this maintenance rhythm, not separate from it. A sealed deck sheds the winter moisture that feeds rot. Deck staining cost varies with square footage and prep work, and homeowners tackling it themselves often start by using a restore-a-deck cleaner or similar wash to strip gray, weathered fibers before the stain goes on. Whether you hire it out or do it yourself, resealing on schedule is the cheapest structural protection a wood deck gets.
What a Professional Adds Beyond This Checklist
A professional brings three things this self-check cannot: access, judgment, and accountability. They crawl under elevated decks you cannot reach, probe framing at connection points hidden behind hardware, and pull a fastener to check for hidden corrosion. They also know local code, which matters if your repair triggers permit requirements. For reference, HomeAdvisor reports a deck building permit typically costs between $230 and $500 depending on location, a number worth knowing before any structural work in San Bernardino County or Riverside County.
Judgment is the part homeowners in your position care about most. If one contractor said your deck is fine and another called it a hazard, this checklist gives you the vocabulary to referee. Ask each of them specifically: how is the ledger fastened, what condition are the post bases in, and did you probe the joist tops? A builder who answers with specifics from your deck earned their opinion. A builder who quotes a full deck replacement without going under the deck did not.
There is a real trade-off to weigh here too. Repairing an old frame keeps costs down now but leaves you maintaining aging wood; replacing it costs more upfront but resets the clock and opens the option of composite decking with far less upkeep. Neither answer is wrong. The right one depends on what your checklist found, how long you plan to stay in the home, and, for sellers, what the buyer's inspector will flag either way.
The Bottom Line for Ontario, CA Homeowners
Run the deck safety inspection checklist from the ground up: footings, posts, ledger, frame, railings, hardware, then boards. Structural findings at the ledger or posts mean stop using the deck for gatherings and get a professional out promptly. Surface-only findings mean you have options, and time to compare them.
Either way, you will walk into any repair or replacement conversation knowing what a professional inspector knows about your own deck. That is the difference between hoping a contractor is honest and being able to verify it yourself, before your next family gathering puts weight on those boards.
If you need custom deck design, Inland Empire Decks can help.
Prefer to talk it through? Call (909) 298-8578 — a quick call is usually the fastest way to get a straight answer for your situation.