Elevated Deck vs. Ground-Level Deck: Structure, Cost, and Labor Differences
If your backyard in Ontario, California slopes away from the house, drops off at a walkout basement, or sits below a second-story door, the elevated vs. ground deck question is not about looks. It is about structure. Choosing between an elevated deck and a ground-level deck changes the footings, the framing, the permit path, and the labor hours on your project. This guide walks through the decision step by step, so you can plan a build that actually fits your lot instead of a cookie-cutter layout that ignores your grade.
Most of the articles ranking for this topic assume a flat yard and a weekend DIY floating deck. That advice falls apart the moment your yard drops three feet from the back door to the fence line. Here is the process a deck builder working sloped lots across the Inland Empire would walk you through.
Step 1: Measure Your Grade and Finished Deck Height
Start with one number: how far the deck surface will sit above the ground at its highest point. This single measurement drives almost every structural and cost decision that follows.
First, mark where the deck will attach to the house or where its surface needs to land, such as the threshold of a sliding door. Then measure straight down to the ground at that point, and again at the farthest corner of the planned deck footprint. On a sloped backyard in San Bernardino County, those two numbers can differ by several feet, and that difference is what confuses builders who only do flat ground-level work.
Here is the practical dividing line between an elevated deck and ground level construction:
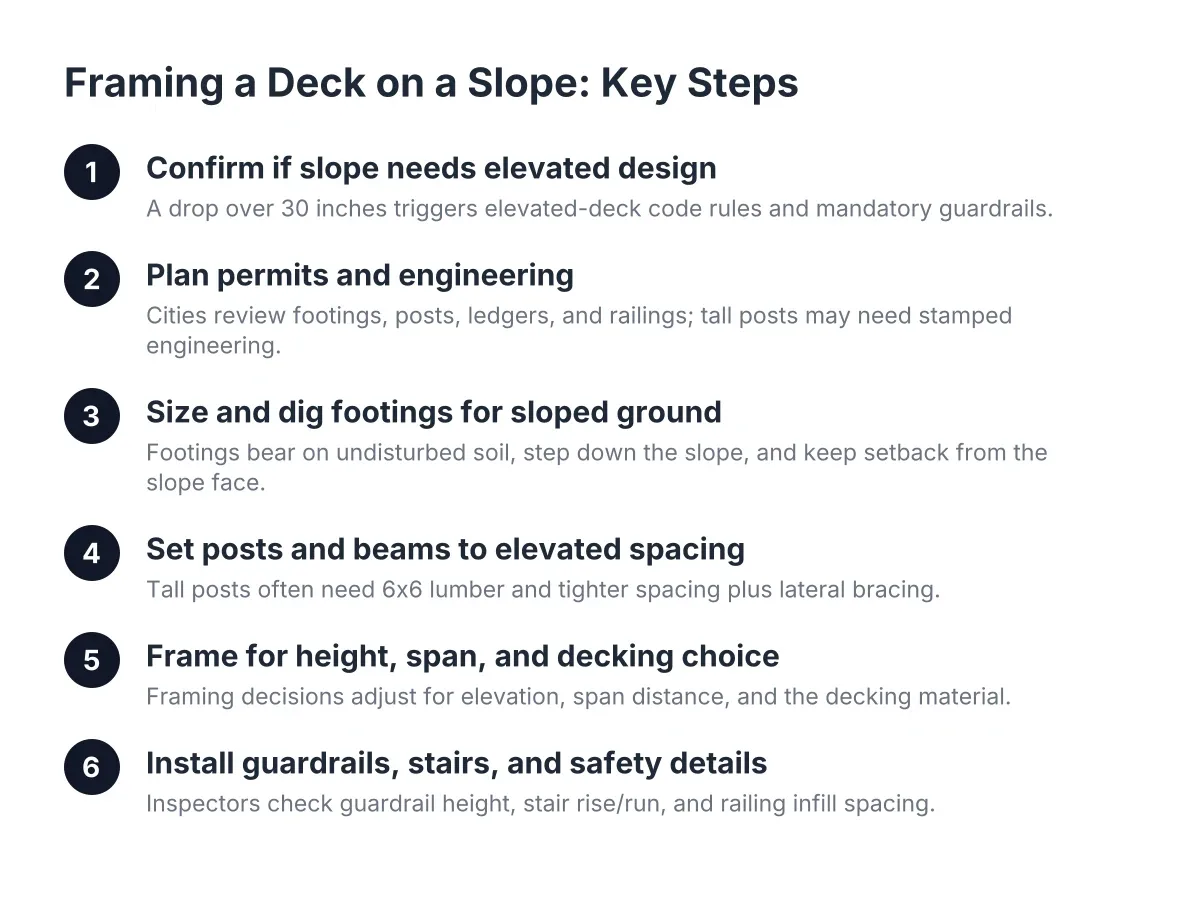
- Under about 30 inches above grade: Most jurisdictions treat this as a low or ground-level deck. Guardrails are usually not required, framing is simpler, and in some cases a freestanding deck can skip parts of the permit process.
- Over 30 inches above grade at any point: You are now in elevated deck territory. Guardrails become mandatory, stairs need code-compliant rises and handrails, and the structure must resist lateral movement, not just hold weight straight down.
- Second-story height (8 feet or more): Beams get larger, posts often need bracing, and a structural engineer's input is common, especially on attached decks in seismic Southern California.
Write down your high-point measurement before you call anyone. A builder who hears "the deck surface will be 54 inches above grade at the back corner" can give you a far more accurate answer than one who hears "my yard kind of slopes."
Step 2: Understand How Elevated and Ground-Level Deck Structures Differ
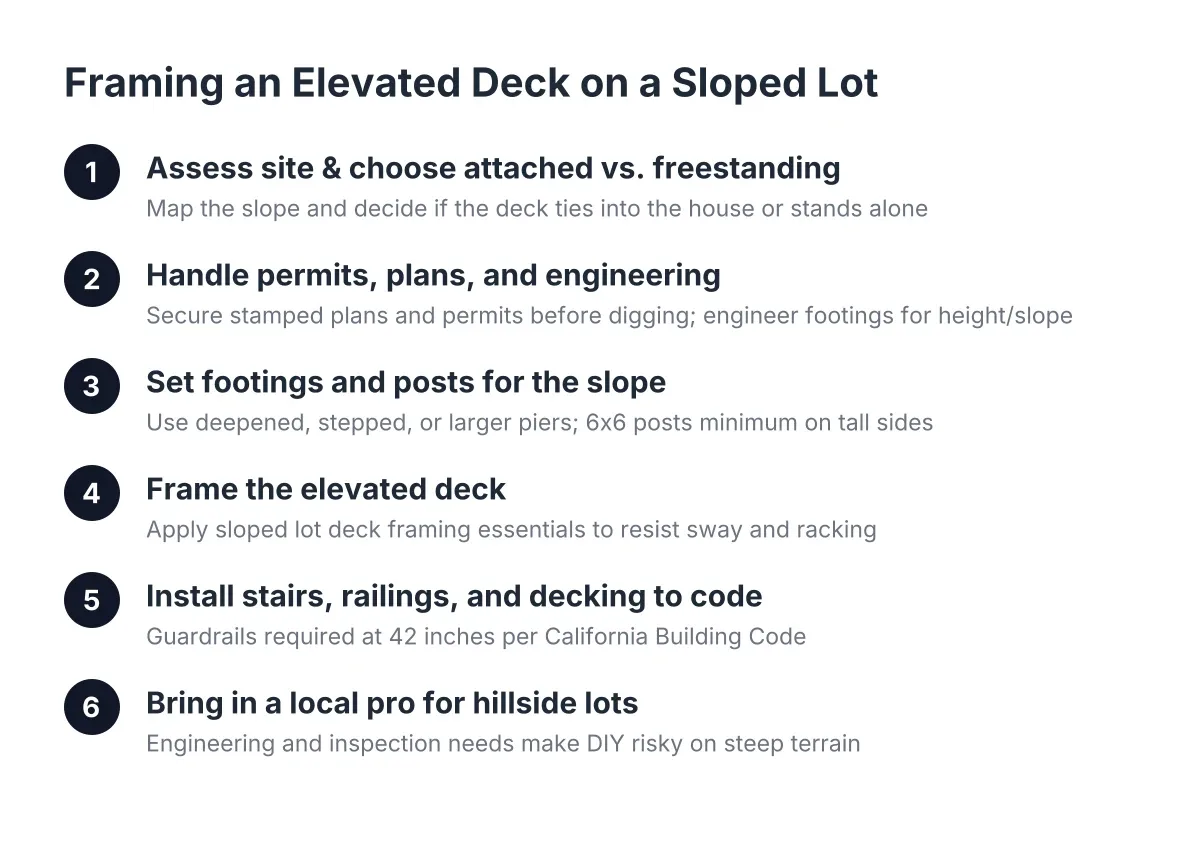
An elevated deck and a ground-level deck differ in three structural areas: footings, posts and beams, and lateral bracing. A ground-level deck mostly resists gravity. An elevated deck resists gravity plus sway, which is why it needs deeper footings, engineered post connections, and often diagonal bracing or an engineered ledger attachment to the house.
Footings: where the real difference starts
What is a ground level deck, structurally? It is a platform sitting on shallow footings or pier blocks, close enough to grade that a footing failure means a slightly uneven board, not a safety problem. Ground level deck height is low enough that the frame can almost rest on the soil.
Elevated decks flip that equation. Every pound of the deck, the furniture, and the people on it travels down through a handful of posts into concrete footings. On a slope, the downhill footings must be dug deeper to reach undisturbed soil, because fill dirt near the surface of a graded lot can settle. Deck footing and post installation on a hillside often means footings of different depths across the same deck, sized to the load each post carries.
Posts, beams, and bracing
On a flat ground-level build, a 4×4 post or a simple beam-on-blocks layout can work. Once the deck rises past a few feet, posts typically move to 6×6 lumber, beams get sized by span tables or an engineer, and knee bracing or shear panels control side-to-side movement. For a second-story deck attached to the house, the ledger connection and its flashing are the most critical details on the entire project, because ledger failures cause most serious deck collapses.
In addition, 2026 California residential code requirements for attached decks include lateral load connections at the ledger, which is one more reason an attached deck on a hill is not a DIY-tutorial project. Structural engineering for elevated decks is a line item worth budgeting, not a sign your builder is padding the quote.
Step 3: Compare Elevated Deck and Ground Level Deck Costs Honestly
An elevated deck costs more than a ground-level deck of the same size because it uses more material and more labor, not because builders charge a slope penalty. The decking surface costs the same either way. The difference lives underneath: taller posts, bigger beams, deeper footings, required railings, and stairs.
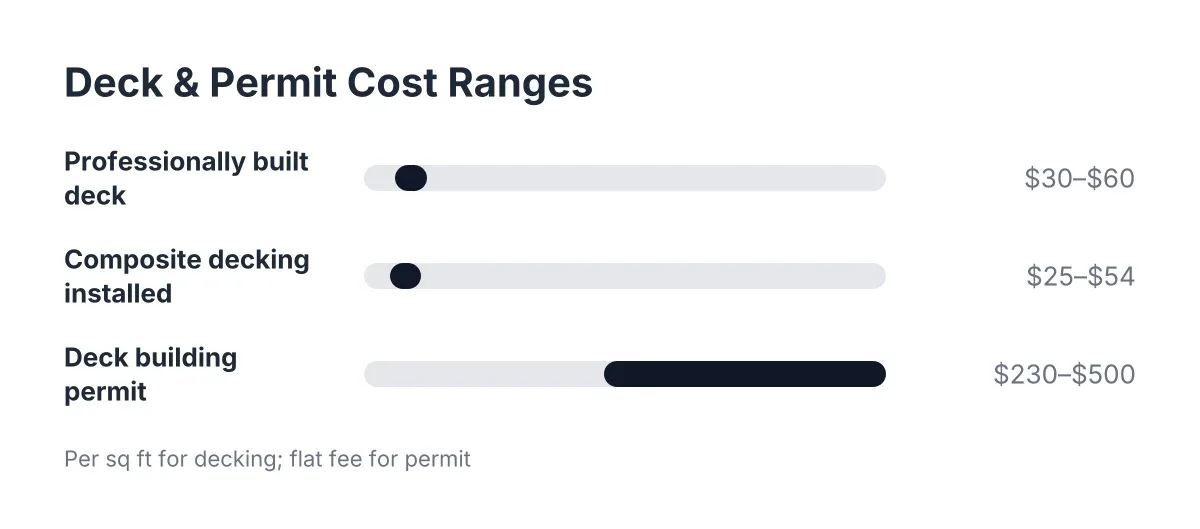
For context, Angi puts the average cost of a professionally built deck at $30 to $60 per square foot, and composite decking at $25 to $54 per square foot installed. Elevated builds tend to land in the upper part of those ranges, while simple ground-level platforms sit near the bottom. Permits add their own line: a deck building permit typically runs $230 to $500 depending on location, according to HomeAdvisor.
Here is where the extra money actually goes on an elevated build:
- Excavation and concrete. Deeper footings on a slope mean more digging and more concrete per footing.
- Structural lumber. Taller 6×6 posts, larger beams, and bracing hardware add material cost.
- Railing. Deck railing installation runs the full perimeter of any deck over 30 inches, and railing is priced by the linear foot.
- Stairs. A staircase from a second-story deck down a slope is a small framing project of its own.
- Engineering and permits. Elevated and attached decks in Ontario, CA generally need drawings, and tall ones may need stamped calculations.
As a rough illustration, suppose a homeowner in Rancho Cucamonga wants a 300-square-foot deck off a walkout level that sits five feet above the downhill side of the yard. In that scenario, the decking boards cost the same as they would on flat ground, but the footings, posts, railing, and a staircase could add a meaningful share on top of a flat-lot build of the same size. Your earlier research on elevated deck construction cost will make more sense once you see the quote broken into those categories.
Step 4: Match the Deck Type to Your Lot, Not the Other Way Around
Next, resist the urge to force a ground-level design onto a sloped yard just to save money. A ground-level deck on a grade that drops four feet means either massive fill and retaining work or a deck that only covers the small flat portion near the house. Elevated deck construction exists precisely to turn that unusable slope into level outdoor living space without regrading the yard.
A few matches that work well on Inland Empire lots:
- Walkout basement or raised first floor: An attached elevated deck at door height, with stairs down to grade, connects the house to the yard in one structure.
- Steady slope away from the house: A single elevated deck with stepped footings, or a multi-level deck that follows the grade down in platforms, each level closer to the ground.
- Steep drop or questionable soil near the house: A freestanding deck set on its own footings avoids loading the house foundation and can simplify the ledger question entirely.
The raised deck vs ground level choice is rarely either-or on a sloped lot. Many of the best designs combine both: an elevated section at the door stepping down to a ground-level pad at the yard, which breaks one tall railing-wrapped platform into friendlier spaces.
Step 5: Plan Permits, Engineering, and the Build Sequence
Permits for elevated decks in Ontario, California run through the city building department, and the review looks harder at footings, ledger details, and railing height than it would for a low platform. Therefore, get your site plan and framing drawings in order before you set a start date. Deck permits and planning is the slowest phase of most elevated builds, not the construction itself.
Once approved, the build follows a consistent sequence. Searches for how to build a deck step by step with pictures mostly show flat-lot floating decks; the elevated version follows the same logic with heavier structure at each stage:
- Layout and footing excavation, with depths set per the plans at each post location.
- Concrete footings poured and inspected before anything gets built on top.
- Post and beam framing, plumbed and braced, with hardware connecting every joint.
- Ledger attachment and flashing if the deck is attached to the house.
- Joists, blocking, and any lateral bracing the plans call for.
- Decking, stairs, and railing, followed by final inspection.
However, know where the professional line sits. A low freestanding platform under 30 inches is within reach for a capable DIYer. An elevated deck vs. ground level comparison stops being academic the moment your structure holds people eight feet in the air; footing design, ledger connections, and lateral bracing on a slope are jobs for an experienced deck builder, and often an engineer.
Step 6: Pressure-Test Your Builder Before You Sign
Finally, screen for slope experience directly. Plenty of local companies build competent flat-ground decks and quietly pass on anything with grade. If a contractor seems confused when you describe your backyard, that is your answer.
Ask these questions and listen for specifics:
- How will you size and set footings on the downhill side of my slope?
- Will this deck be attached or freestanding, and why for my lot?
- At what height do you bring in a structural engineer?
- How do you flash and fasten the ledger on an attached deck?
- Can you show me a past elevated or multi-level deck build on a lot like mine?
A deck builder who works sloped lots across Ontario, Rancho Cucamonga, Upland, and the surrounding Inland Empire will answer those in plain language without hesitation. One more point worth knowing as you commit: the investment tends to hold its value. According to the National Association of Realtors' 2023 Remodeling Impact Report, homeowners recover 89% of the cost of a new wood deck through added home value, and on a sloped lot the deck often creates the only usable outdoor space the property has.
Your yard's grade is not a problem to apologize for. It is a design input. Measure it, structure the deck for it, budget for what sits below the boards, and the slope that scared off other quotes becomes the best feature of the finished outdoor living space.
If you need custom deck design, Inland Empire Decks can help.
Prefer to talk it through? Call (909) 298-8578 — a quick call is usually the fastest way to get a straight answer for your situation.