How to Install a Handrail on Your Deck: Steps California Contractors Follow
If you are learning how to install a handrail on a new or existing deck, the process matters more than the material. A railing that looks great but wobbles at the post is a failed railing. This guide walks through the steps deck contractors in Ontario, California follow for deck railing work, from code checks to the final cap rail. Whether you plan to tackle a section yourself or want to understand what your deck builder is doing in your backyard, knowing the sequence helps you judge whether the work is being done right.
One note before the steps. Deck railing installation on any deck more than 30 inches above grade is a life-safety item under the California Building Code. If your deck sits high off the ground, or the framing underneath is older, a professional install or at least a professional inspection is the safer call. According to the North American Deck and Railing Association (NADRA), about 50 percent of the roughly 50 million decks in the U.S. are more than 25 years old, and older framing often cannot hold a modern railing without reinforcement.
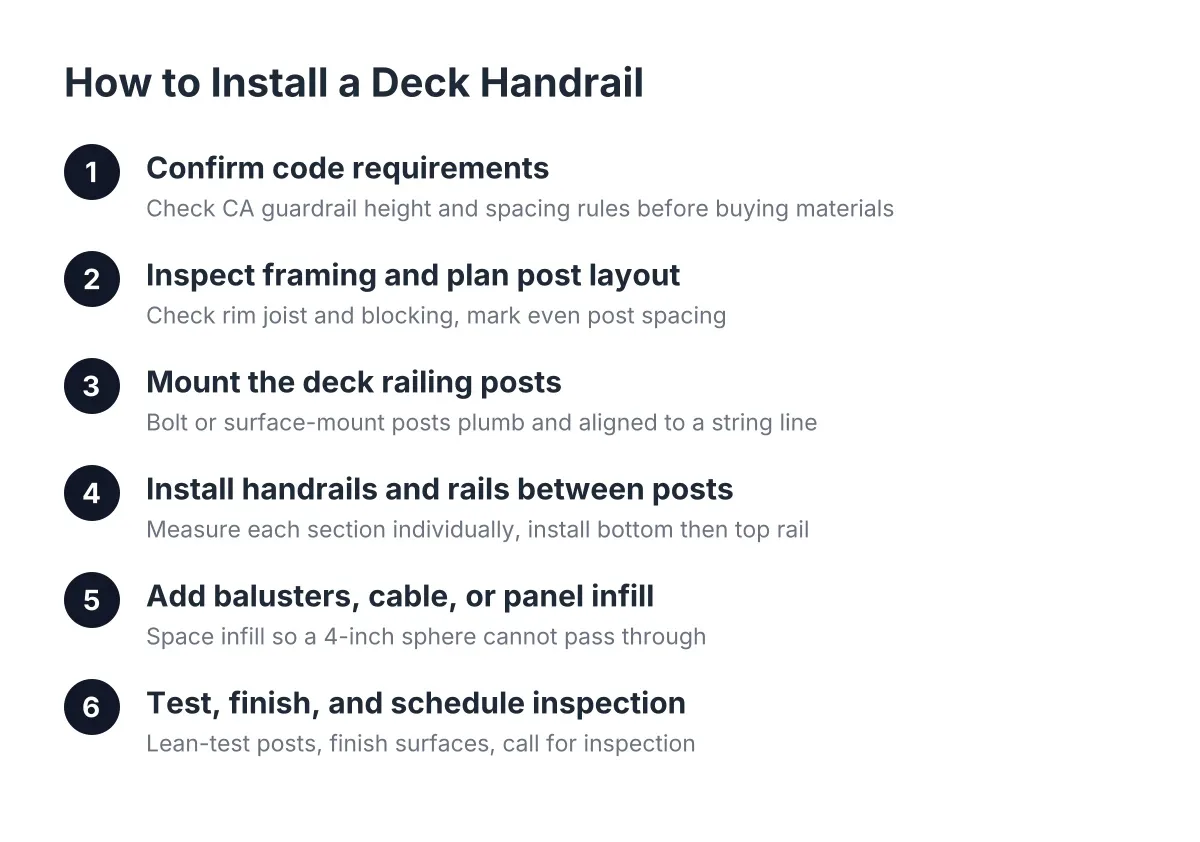
Step 1: Confirm the Code Requirements Before You Buy Anything
Start with the rules, because they decide your measurements. The California Building Code requires a minimum guardrail height of 42 inches for most residential decks more than 30 inches above grade, according to the California Building Standards Commission. That is taller than the 36 inches you see in many national how-to videos, which are often written for other states. Buy a 36-inch railing kit for an elevated deck in San Bernardino County and you may fail inspection.
Beyond height, plan for these 2026 requirements in most Inland Empire jurisdictions:
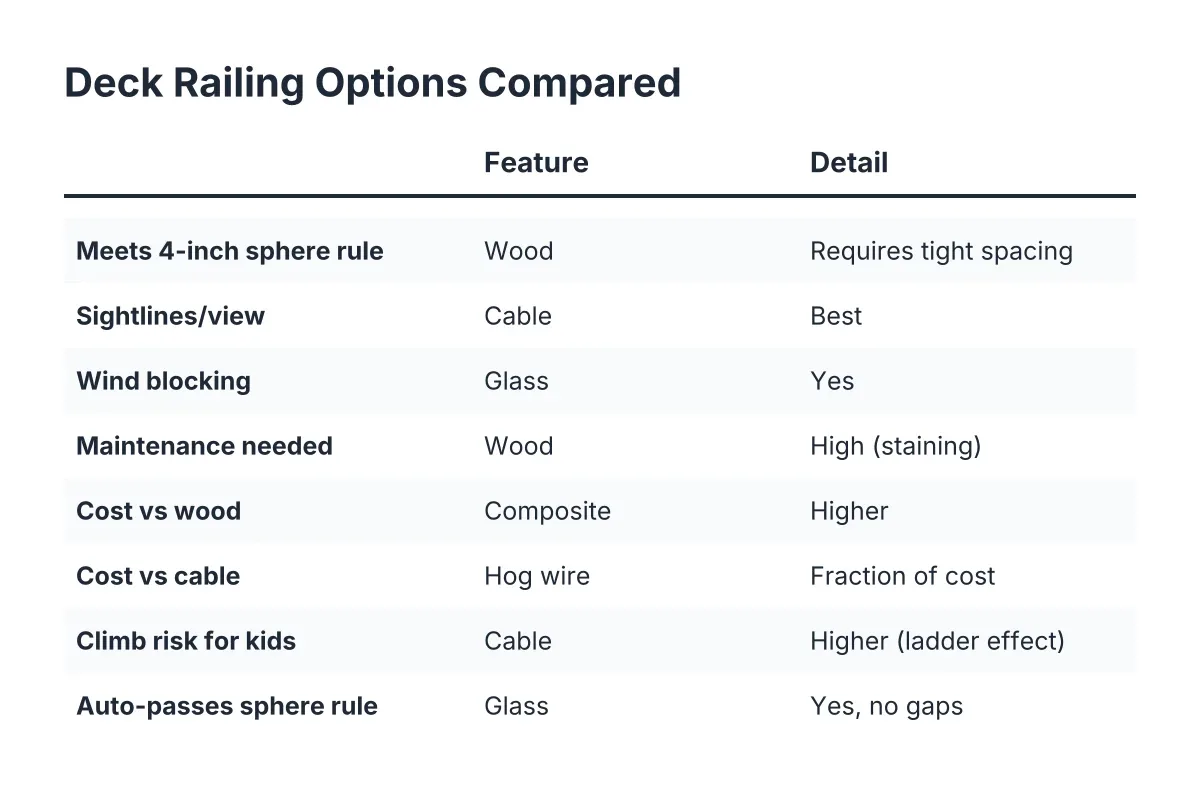
- Balusters or infill spaced so a 4-inch sphere cannot pass through
- A graspable handrail on stairs with four or more risers, typically mounted 34 to 38 inches above the stair nosing
- Posts and connections strong enough to resist a concentrated load at the top rail
- No climbable horizontal patterns in some cities; check with your local building department
In addition, if your railing project is part of a new deck build or a deck replacement, it usually falls under the same permit. According to HomeAdvisor, a deck building permit typically costs between $230 and $500 depending on location. In Ontario, CA, your deck builder normally handles permits and planning as part of the job, but ask; do not assume.
Step 2: Inspect the Framing and Plan Your Post Layout
Deck railing posts carry the entire load, so the framing they attach to has to be solid. Before layout, check the rim joist and blocking for rot, splits, or loose fasteners. A wobbly railing is almost never a railing problem; it is a connection problem underneath. If you are replacing a wobbly deck railing on an older deck, plan to add solid blocking between joists wherever a post lands.
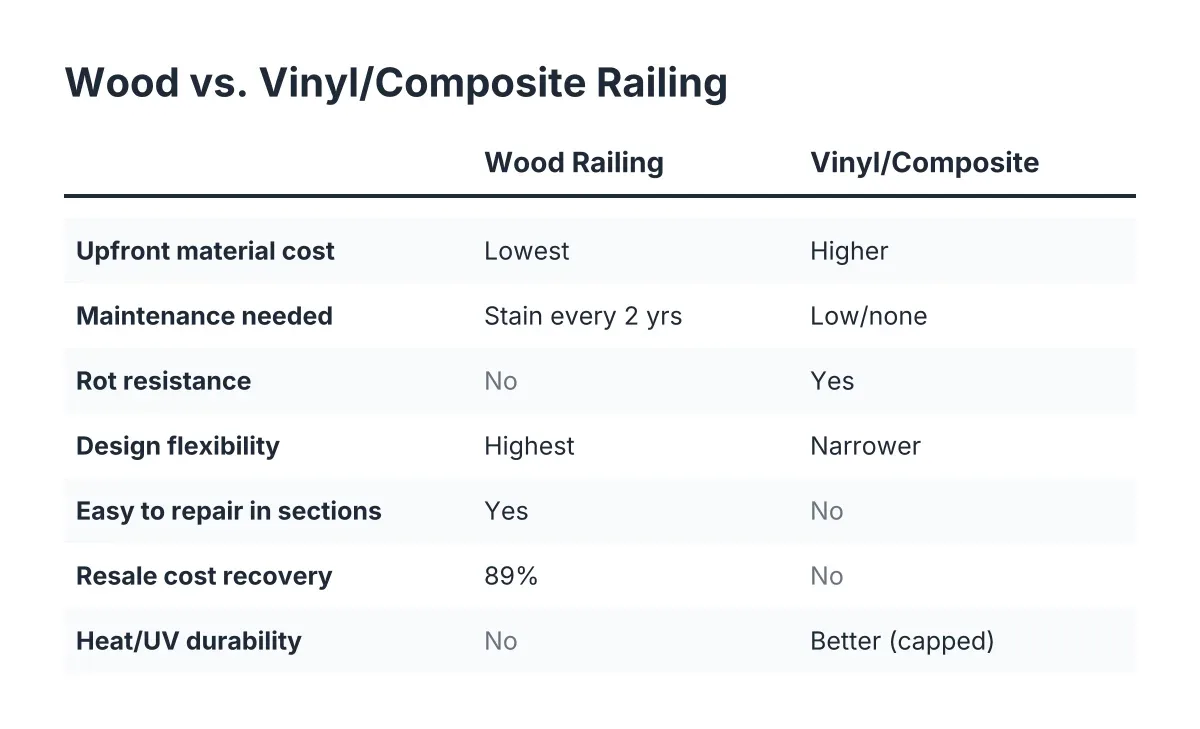
Next, mark post locations. Most systems, whether pressure treated wood deck railings or composite deck railing options, call for posts no more than 6 to 8 feet apart, with a post at every corner and at the top and bottom of every stair run. Measure your total rail length and space posts evenly rather than leaving one long span at the end. Even spacing looks intentional and keeps every section within the rating of your rail kit.
For example, suppose a homeowner in Rancho Cucamonga has a 16-foot deck edge. Two posts at the ends and two in the field give three even sections just over 5 feet each, well within spec, instead of two 8-foot spans that flex at the middle.
Step 3: Mount the Deck Railing Posts
Posts get attached one of two ways: bolted to the inside or outside of the rim joist, or surface-mounted to the deck boards with a structural base. Through-bolting to the rim with two carriage bolts per post, plus blocking behind the rim, is the standard approach for wood posts. Surface-mount bases are common with aluminum and composite systems, but they must land over framing, never over decking alone.
Set your first corner post plumb, check it with a level on two faces, and bolt it snug but not final-tight. Then set the opposite corner post, run a string line between the two at top-rail height, and set the field posts to the line. Once every post is plumb and aligned, fully tighten all hardware. A typical crew tests each post by leaning on it hard; if it moves at all, the connection gets reworked before any rail goes on.
Here is where knowing how to install handrail posts on a deck separates a clean job from a callback. Rushing this step means every later step inherits the wobble.
Step 4: Install Handrails and Rails Between Posts
With posts set, measure each section individually. Do not cut all your rails to one length; post spacing varies by a fraction even on careful layouts. Cut the bottom rail first, install it level between posts using the brackets supplied with your system, and keep it no more than 4 inches above the deck surface so the sphere rule is met at the bottom gap.
Then cut and install the top rail the same way. On a 42-inch guardrail, measure from the deck surface, not from the bottom rail, so small variations do not stack up. Composite and aluminum kits usually include hidden brackets; wood rails are typically toe-screwed or bracketed into the post faces. Pre-drill wood rails near the ends to prevent splitting, especially with pressure treated lumber that is still wet from the yard.
Step 5: Add Balusters, Cable, or Panel Infill
Infill is where style decisions show up. Wood or composite balusters install on even centers; divide the section length by the maximum allowed spacing and adjust so gaps stay under 4 inches. A simple spacer block cut to your gap width keeps the rhythm consistent without measuring every baluster.
Cable railing and glass panel deck railing follow different rules. Cable needs proper tensioning hardware and stiff posts, because loose cable can deflect past the 4-inch limit under pressure. Glass panels need rated clamps and tempered glass. Both look sharp on a modern outdoor living space, but both are less forgiving of layout errors than wood. This is a spot where many homeowners hand the project to a deck builder even after doing the posts themselves; the trade-off is higher deck railing cost against a system that passes inspection the first time.
The market reflects how popular these upgraded systems have become. According to Grand View Research, the global composite railing and decking market was valued at $4.7 billion in 2025 and is projected to reach $12.6 billion by 2033.
Step 6: How to Install the Handrail on Deck Stairs
Installing a handrail on deck stairs means adding a graspable rail, mounted 34 to 38 inches above the stair nosings, on any stairway with four or more risers. The guardrail along the stairs is separate from the handrail; a 2×6 cap on top of stair posts is not graspable and does not satisfy code on its own.
First, set your stair posts at the top and bottom of the run and confirm the guardrail height along the slope. Then mark the handrail height at the top and bottom nosings and snap a line between the marks; the handrail follows the stair pitch exactly. Mount handrail brackets into the posts or into solid framing, never into trim alone, spacing them no more than about 4 feet apart. Set the rail on the brackets, confirm the height at both ends, and fasten.
The same logic applies if you need to install a stair railing to a wall, such as steps running beside the house. Locate the studs, mount the brackets into framing, and keep the rail continuous from the top nosing to the bottom. Return the ends of the rail to the wall or post so nothing can catch a sleeve or a bag strap.
Step 7: Test, Finish, and Schedule Inspection
Finally, work the whole railing hard before calling it done. Push laterally on every post, pull up on the top rail mid-span, and press every infill section. Nothing should flex noticeably. Recheck heights: 42 inches at the guardrail, 34 to 38 inches at the stair handrail, gaps under 4 inches everywhere.
For wood systems, apply stain and sealer once the lumber has dried enough to accept it; unfinished pressure treated railings in Inland Empire sun will check and gray within a season or two. If the work was permitted, schedule the final inspection before you load up the deck with furniture. In that scenario, the inspector will check heights, gaps, and post rigidity, the same things you just tested.
When Handrail Installation Is Worth Handing to a Pro
Knowing how to install a handrail and choosing to do it yourself are two different decisions. A ground-level deck with straight runs and a wood baluster kit is a reasonable weekend project for a careful homeowner. An elevated deck, a multi-level layout, cable or glass infill, or any deck with questionable framing underneath is a job for a local deck builder who works with Ontario, CA inspectors regularly.
The honest math for most New-Yard Upgraders building from scratch: railing is a fraction of total deck cost, and it is the one part of the deck that has to catch a falling person. If you are already hiring out the deck construction, having the same crew handle the railing keeps posts tied into framing that was built with those loads in mind, which is the cheapest time to get it right.
If you need custom deck design, Inland Empire Decks can help.
Prefer to talk it through? Call (909) 298-8578 — a quick call is usually the fastest way to get a straight answer for your situation.