Liquid Rubber Deck Coating vs Deck Restoration Paint: What Lasts in Ontario, CA
If your deck boards are gray, cracked, or soft in spots, you have probably looked at deck restoration paint and liquid rubber polyurethane deck coatings as a cheaper way out than tearing the whole thing down. Sometimes that instinct is right. A thick coating can buy an aging deck several more years, and for a home-seller in Ontario, CA trying to pass inspection before listing, that can be money well spent. But a coating over a rotten frame is a short-term patch that fails fast, and it can hide problems an inspector will flag anyway.
This guide walks you through the process the way a local deck builder would: check the structure first, decide whether a coating makes sense, then apply it correctly if it does. The stakes are not small. According to the North American Deck and Railing Association (NADRA), about 50 percent of the roughly 50 million decks in the U.S. are more than 25 years old. Here in the Inland Empire, decades of Southern California sun do most of that aging, so the decision deserves a careful look before you open a can of paint.
Step 1: Inspect the Frame Before You Buy Anything
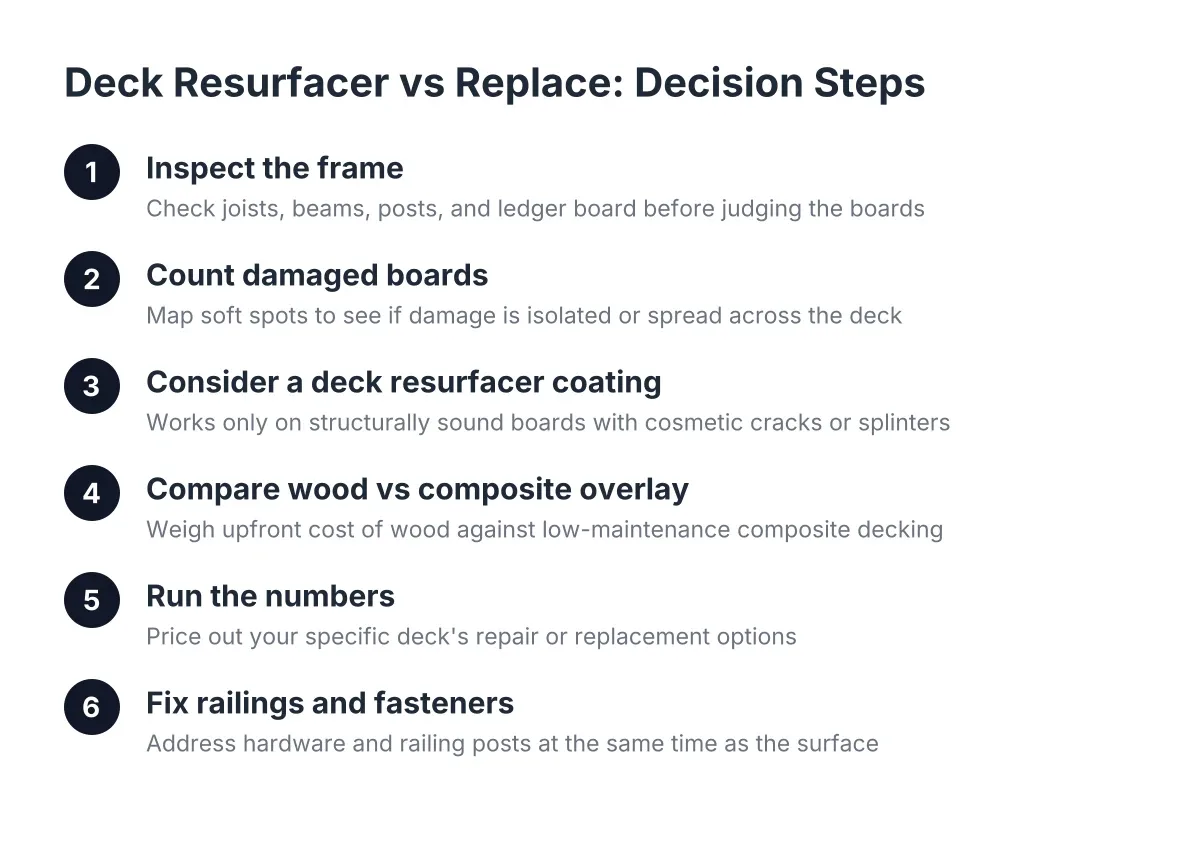
Start underneath the deck, not on top of it. Deck restoration paint and liquid rubber coatings only fix surfaces. If the joists, beams, posts, or ledger board are compromised, no coating saves the deck, and you would be painting over a safety problem.
Grab a screwdriver and probe these spots:
- Joist tops and ends, especially where boards meet. If the screwdriver sinks in easily, that is rot.
- The ledger board, where the deck attaches to the house. Soft wood or missing flashing here is the most dangerous failure point on any deck.
- Post bases and footings. In San Bernardino County, posts sitting in soil contact or on cracked footings are common on older decks.
- Railing connections. Grab each post and push hard. Movement means the connection needs repair before anything else.
- Fastener condition. Rusted-through nails or screws suggest the whole structure has absorbed years of moisture.
Here is the honest dividing line. If the frame is solid and only the deck boards are worn, you have options: a coating, deck board replacement, or full deck resurfacing with new wood or composite decking over the existing frame. If the frame is soft, leaning, or pulling away from the house, stop. That deck needs deck repair or deck replacement, and a professional inspection is worth the call. Two contractors giving you opposite answers usually means one of them never crawled underneath.
Step 2: Decide Between Deck Restoration Paint and Liquid Rubber Coating
Both products aim at the same problem, but they work differently, and the difference matters in Inland Empire heat.
How deck restoration paint performs on older boards
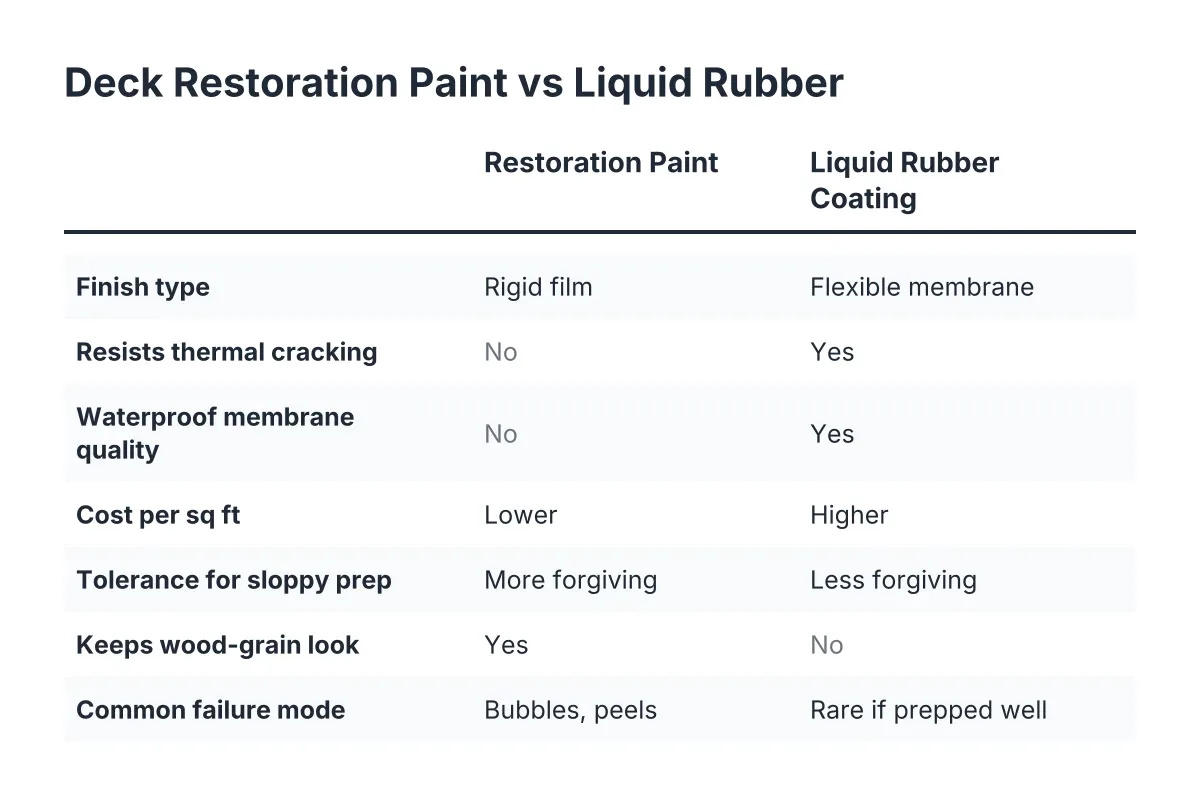
Deck restoration paint is a thick, textured coating, often ten times heavier than regular deck paint, designed to fill cracks up to about a quarter inch and lock down splinters. You will see these products at every home improvement store, often with sand-style grit mixed in for traction. On a structurally sound deck with cosmetic wear, they can look sharp for a season or two.
However, the failure mode is well documented. These coatings sit on top of the wood as a film. When moisture gets under the film through a board end or a missed crack, the coating bubbles and peels. In Ontario, California, the bigger enemy is thermal movement; boards that bake at 100 degrees in August and cool fast at night expand and contract, and a rigid film eventually cracks with them. Once it peels, removal is a miserable job of scraping and sanding before you can do anything else.
How a liquid rubber polyurethane deck coating differs
A liquid rubber polyurethane deck coating cures into a flexible, waterproof membrane rather than a rigid film. That flexibility is the key advantage: it stretches with the wood as temperatures swing, so it resists the cracking that kills thick restoration paints in our climate. Applied in multiple coats at the right thickness, it works as a true deck waterproofing membrane, which is why these systems are common on rooftop decks and balconies over living space.
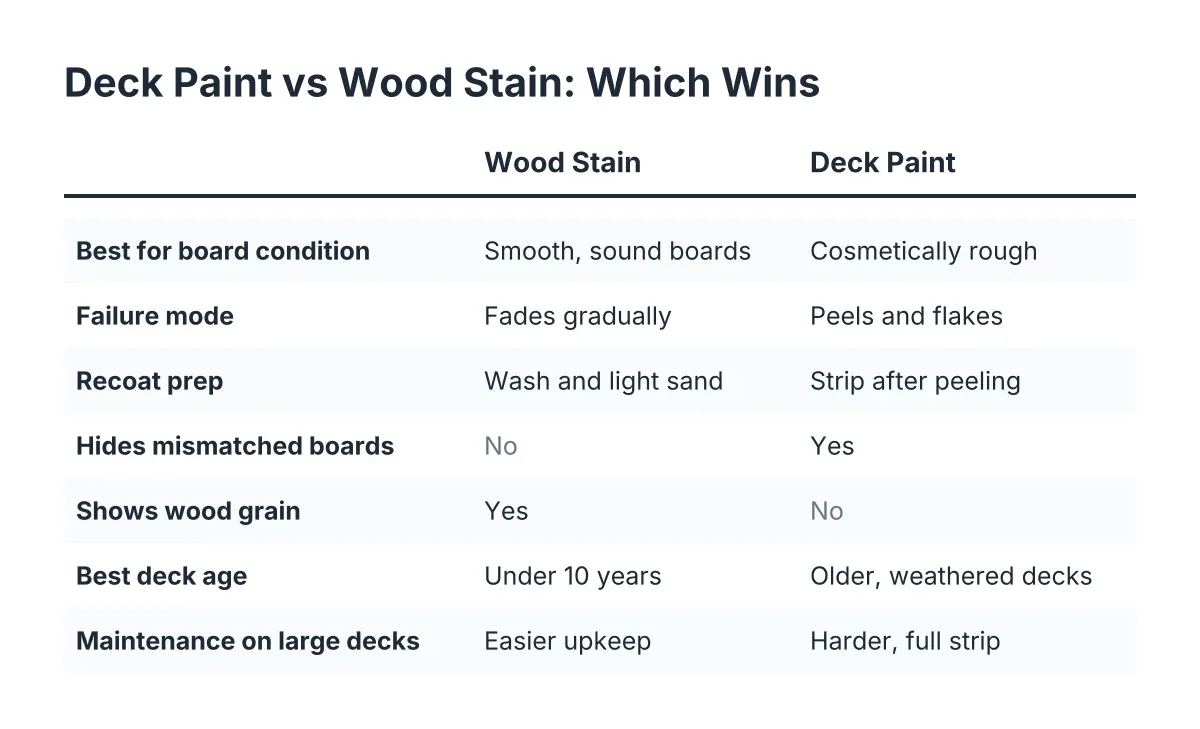
The trade-offs are cost and prep. Liquid rubber systems cost more per square foot than a bucket of restoration coating, and they are far less forgiving of sloppy surface prep. They also change the look of the deck; you get a uniform membrane finish, not a wood-grain stain. For a painted or badly weathered deck you plan to keep five more years, that trade is often worth it. For a deck you want to look like wood again, staining and sealing after board replacement is the better path.
Step 3: Price the Coating Against Resurfacing and Replacement
Before buying materials, run the numbers against the alternatives, because a coating is only a bargain if it actually lasts.
As a rough 2026 illustration, suppose a homeowner in Rancho Cucamonga has a 300-square-foot deck with a sound frame but tired boards. A DIY liquid rubber system might run a few hundred dollars in materials plus a weekend of hard prep. Full deck resurfacing with new composite decking over that same frame costs far more up front; according to Angi, composite decking runs $25 to $54 per square foot professionally installed. However, the composite surface can outlast three or four coating cycles with almost no upkeep.
For a home-seller, the math shifts again. A deck flagged on a pre-listing inspection usually needs the safety items fixed, not just coated. Wobbly railings, soft boards, and missing fasteners should be repaired first; then a coating or fresh stain handles the cosmetics. If the deck is far gone, replacement can still pencil out. According to the National Association of Realtors' 2023 Remodeling Impact Report, homeowners recover 89% of the cost of a new wood deck in added home value. One more budgeting note: coatings and board swaps typically need no permit, but structural deck repair or replacement in San Bernardino or Riverside County may, and HomeAdvisor puts typical deck permit costs at $230 to $500.
Step 4: Replace Bad Boards and Repair Hardware First
Never coat over rot. Any board that flexes underfoot, shows black fungal staining, or crumbles at the probe needs deck board replacement before coating day. Coating a spongy board just hides it until a foot goes through, which is exactly the fear that brought most people to this article.
Work through the deck methodically:
- Mark every soft, cracked, or cupped board with chalk.
- Replace marked boards with matching lumber; new pressure-treated boards should dry several weeks before accepting any coating.
- Sink or replace popped fasteners. Screws hold better than nails on an old frame.
- Tighten or re-anchor loose deck railing posts with structural hardware, not just longer screws.
- Fix flashing at the ledger if water has been getting behind it.
In addition, this is the stage where the project sometimes changes scope honestly. Say you planned to replace six boards and discover fifteen are bad, plus two joist ends. At that point, resurfacing the whole deck or calling a local deck builder for a repair quote beats sinking coating money into a surface that is mostly new boards and old problems.
Step 5: Prep the Surface Like the Coating Depends on It
It does. Most coating failures trace back to prep, not product. Whether you chose deck restore paint from a big-box shelf or a liquid rubber system, the sequence is the same.
First, clean the deck with a dedicated deck cleaner and a stiff brush, then rinse thoroughly. Pressure washing works if you keep the tip moving and the pressure moderate; gouging the wood creates fuzz that coatings grip poorly. Next, strip any old peeling paint or failed coating completely. Liquid rubber will not bond reliably over flaking layers.
Then sand glossy or smooth areas so the coating has texture to bite. Vacuum or blow off all dust. Finally, let the deck dry fully. In Inland Empire summer that can be a day; after a winter rain, give it longer. Moisture trapped under a waterproof membrane is the one problem the membrane cannot fix.
Step 6: Apply the Liquid Rubber Coating in Thin, Patient Coats
Follow the specific product's instructions over any general advice, including this one. That said, the rules that matter most in our climate are consistent.
Apply early in the morning. Coating a deck surface at 95 degrees makes the product skin over before it levels, and Ontario, CA afternoons get there fast much of the year. Cut in board gaps and edges with a brush, then roll the field with the roller nap the manufacturer specifies. Multiple thin coats beat one thick one; thick single coats trap solvents and stay soft.
Respect the recoat window between coats, and keep foot traffic off the deck for the full cure time, which can run several days for furniture-ready hardness. Rushing cure is the second most common failure after bad prep.
Step 7: Maintain the Coating and Know Its Limits
Plan on inspecting the coated deck every spring. Look for bubbles, cracks at board seams, and wear paths at stairs and door thresholds. Small failures patched early stay small; ignored ones let water under the membrane and lift large sections.
Be realistic about what you bought. A quality liquid rubber coating on a sound frame can perform for years, while a thick deck restoration paint over marginal boards may start peeling within a couple of seasons. Neither one strengthens the structure underneath. NADRA estimates that of the more than 60 million decks in the U.S., about 30 million are past their useful life, and a coating does not move a deck out of that category. If your frame inspection in Step 1 raised doubts, or the deck is elevated, attached to the house, or headed into a home sale, have a deck professional in Ontario, California look at it before you commit to a coating. A straight answer up front costs less than a failed coating plus the replacement you needed anyway.
If you need custom deck design, Inland Empire Decks can help.
Prefer to talk it through? Call (909) 298-8578 — a quick call is usually the fastest way to get a straight answer for your situation.